
Growing Garlic
Garlic is one of my favorite crops to grow because its timeline is the opposite of most crops we grow. We plant our garlic in October, where it grows a root system in the warm fall days and cool nights. Garlic then goes dormant once the cold winter arrives, sprouts up in early spring, and gets harvested in early July.
Garlic levels out some of the workload in the spring by not needing too much of our time during the most significant part of our planting season. Then, when the busy planting season is winding down in early summer, it’s time to harvest and cure the garlic.
Garlic Varieties
You may quickly be overwhelmed if you search the internet for garlic varieties. There are hundreds of different varieties available!
First, let’s talk types. Garlic varieties will fall into two main types: hardneck and softneck. You can tell the difference easily by looking and feeling for a rigid, pencil-like stalk in the center of the garlic bulb. The hardneck varieties will have this stalk. Softneck varieties will have paper-like skins covering the cloves within the bulb. Grocery store garlic will be a softneck variety because it can be stored for up to 18 months. Hardneck varieties will generally only store well for up to 9 months.
We grow a hardneck variety called German Red. It has a spicy flavor when eaten raw or cooked quickly in sautees or stir-fries but mellows into rich, deep garlic when roasted or carmelized with a slower cooking method. Softneck varieties tend to have a much milder flavor compared to hardneck garlic.
Planting
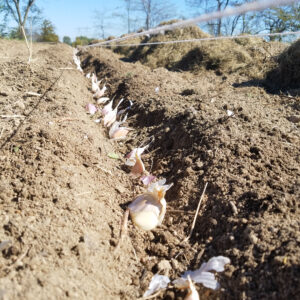
Garlic is planted in mid to late October in our USDA zone 6B location. Planting it much sooner than this means that the cloves may begin to sprout leaves before winter. It still happens for some years, especially in an unusually warm winter.
To plant, begin by separating each bulb into cloves. Each clove will grow into a wholly formed bulb over the next growing season. Cloves are planted about 4 inches deep and about 4-5 inches apart in a row. Each row is about 10 inches apart to allow space to get the wheel hoe between the rows for weed control.
After planting the garlic, we mulch the entire bed with a moderate layer of straw mulch. It’s crucial to get straw with as few weed seeds as possible. One year, we purchased straw from a local wheat farmer, which was so full of seeds that we nearly had a whole wheat field growing the following spring along with our garlic plants!
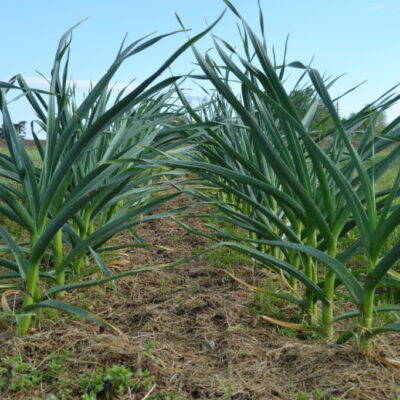
Growing
After the garlic is planted and mulched, there isn’t much to do with it throughout the winter. Once early spring arrives, and the leaves begin to emerge, it’s time for a light application of granular fertilizer. We prefer to use HyrBrix vegetable fertilizer in our garden since it’s organic. A granular fertilizer with micronutrients is important for vigorous growth and big garlic bulbs. We apply a second dose of granular fertilizer in early May, right before the scapes appear.
Harvesting Garlic
Two Crops In One
Hardneck garlic gives two different crops: the garlic bulbs that grow in the ground and scapes, the flowering stalk of a hard-neck garlic plant. Softneck garlic will not produce scapes. The scapes emerge around mid-May. You’ll see a thick, round structure with a pointed end emerge from the center of each plant. We remove the scape so the garlic plant doesn’t expend energy into producing a flower and instead spends that energy growing a bigger underground bulb.
The Scapes
Cut the scapes off with a short, sharp knife. The scapes can be used in a variety of ways. We like them grilled or sauteed like fresh green beans. Or make garlic scape pesto by substituting some or all of the basil in a basic pesto recipe with scapes. When using the scapes in a recipe, I prefer to remove the pointed flowering end of the scape. It has a more fibrous texture that doesn’t work well for making pesto or garlic compound butter.
The Bulbs
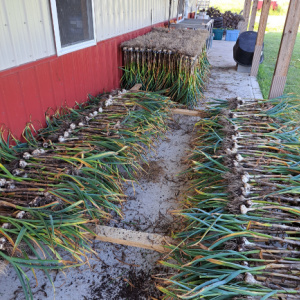
The garlic plants are ready to dig when half of the green leaves turn brown. In our area, that’s usually around the beginning of July. Use a short digging fork to loosen the soil about 6 inches away from the base of the plants. Step the fork into the soil as deeply as possible, then pull back and loosen the soil from around the row of plants. Keep the digging fork away from the bulbs; if you don’t, you risk piercing them with the fork, and they won’t dry and store well.
Curing And Storing
After the garlic is all dug, it needs about a month of airing out in a dry location that won’t get rain and has plenty of air circulation. Lay the entire plants on mesh tables, shelves, fencing stapled to pallets, or some other makeshift way to allow as much airflow as possible, even underneath the plants.
After a month of curing, the garlic can be cleaned and trimmed. Using a good pair of hand pruners, trim the stalk about 4 inches from the neck and trim the roots close to the bottom of the bulb. We remove any dried-on dirt from the bulb’s surface by hand but don’t use any water. Getting the bulbs wet may shorten their storage ability and cause them to rot.
Hard-neck garlic will be stored in a dry, dark place for about 9 months after harvest. We store ours in wooden crates and move them to our basement, where a dehumidifier maintains a 50% relative humidity year-round.
Saving Seed
If you plan to grow garlic year after year, save your best, largest bulbs as seed garlic. Choose the largest bulbs with the best conformation to your desired characteristics to save as seed. When cleaning and trimming, do not cut the roots from the bulbs you intend to keep for planting. Store the seed garlic in a cool, shady spot with plenty of airflow. We keep ours on a wire shelf in the barn until October rolls around and it’s time to plant.
With some planning and consideration when choosing your garlic variety, you can have a perpetual supply of one of the most widely used flavors in the kitchen. Do yourself a big favor and visit your local farmers market to find the best garlic. Chat with the farmers, ask about their varieties, buy at least two bulbs of each variety you may want to plant, use one bulb (or even just one clove of one bulb) to see how you like the flavor, then plant the other bulb.
Consider tucking a few garlic cloves in your garden or landscaping this fall to enjoy your homegrown culinary garlic next summer.